

how to fix creaky floors
How to Fix Squeaky Floors
Five easy ways to silence your floor
![]() Time
Time
A full day
![]() Complexity
Complexity
Beginner
![]() Cost
Cost
Less than $20
Introduction
Fast, easy ways to silence floor squeaks. No special skills or tools needed. We'll show you everything you need to know.
Tools Required
Materials Required
- 2x4
- 2x8
- Construction adhesive
- Screws
- Shims
How to stop wood floors from squeaking: First, find the source of the squeak
Floor squeaks are caused by wood rubbing against a nail, other wood, or even ductwork and piping. Finding the squeak can be difficult, but if the squeaking floor is open from below, you're in luck. You'll have several options to stop it.
To locate the source of the squeak, have a helper spring up and down on the squeaky area while you listen and watch for subfloor movement from below. Also, look for loose nails or subfloor seams rubbing against each other. It doesn't take much movement to cause a squeak, especially since your floor amplifies the sound like a giant soundboard.
If you're working alone, measure the squeak's location in relation to a wall or heating register that you can locate from below. Then go downstairs and measure these distances along the subfloor. Or, if your floor is carpeted, you can drive an 8d finish nail through it to mark the squeak source.
Here is a collection of fixes for the most annoying home squeaks, creaks, gurgles and bangs.
Project step-by-step (13)
Step 1
Squeaky wood floors? Fill gaps with shims
Finding the exact cause of the squeak, and then choosing the best remedy, isn't always a simple task. Don't be surprised if you have to try several solutions before you stop it for good. Look for gaps between a joist and the subfloor first. Plug in a drop light and examine the area closely; a gap or movement may not be obvious.
Step 2
Shim between the joist and subfloor

If you spot a gap, use the wood shim solution to stop floor movement. Shims are available at any home center or lumberyard. Push a pair of shims in lightly. If you drive them in, you'll widen the gap and potentially create a new squeak.
Slide a pair of shims into the gap for a snug fit. Draw a line on each shim to mark the depth. Don't wedge the gap wider.
Sign Up For Our Newsletter
Complete DIY projects like a pro! Sign up for our newsletter!
Do It Right, Do It Yourself!
![]()
Step 3
Glue the shims
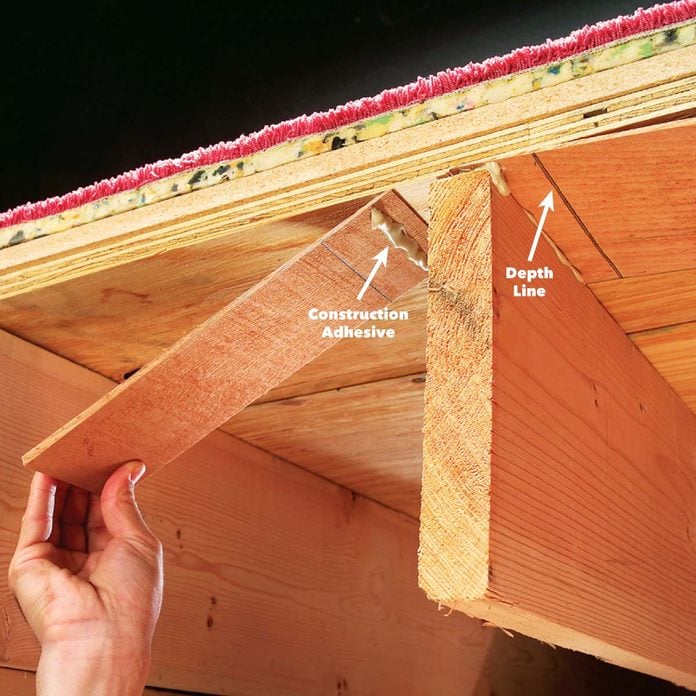
Adding construction adhesive before final assembly makes the fix permanent while filling in irregularities between the wood surfaces. Add a bead of construction adhesive to both sides of each shim. Shove shims back into the gap. Align to the depth line.
Step 4
Trim the shims
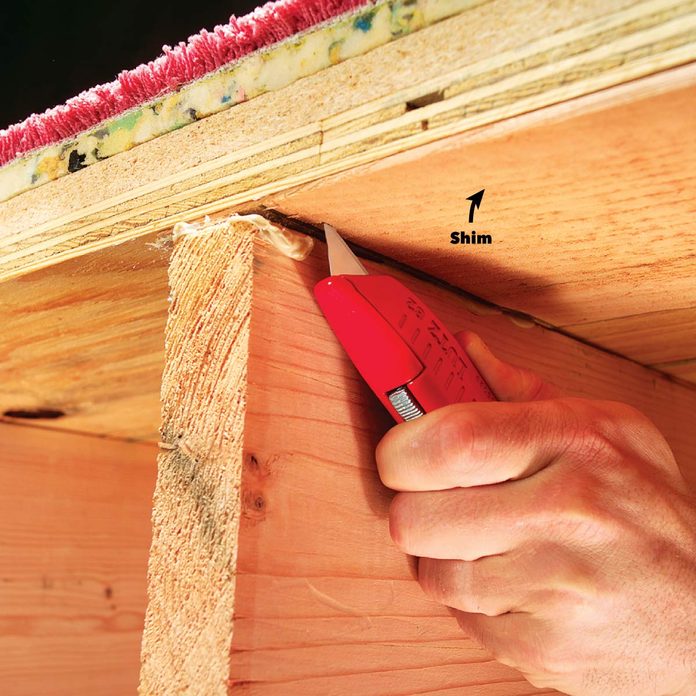
Score the excess shim two or three times with a sharp utility knife and snap it off. Keep off the floor for four hours while the adhesive hardens.
Step 5
Reinforce the joists
If you spot wide gaps along sagging or damaged joists or see that a subfloor edge is poorly supported, add blocking to support the subfloor and stop movement. Also, keep an eye out for protruding nails and clip them with diagonal cutters. (You may need a strong grip and a few tries to work your way through the nail!)
Step 6
Measure the gap
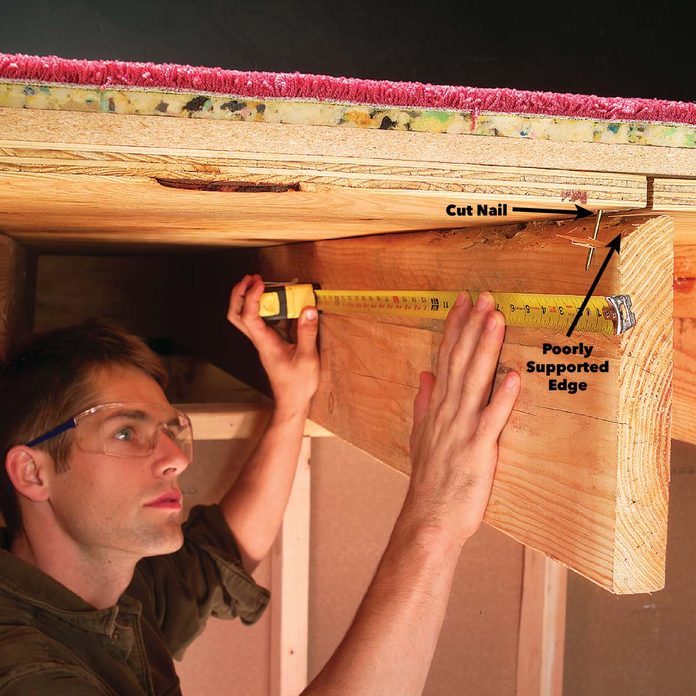
Measure the length of the subfloor gap for 2x4 blocking. Extend the block about 1 ft. on each end. Cut away protruding nails with diagonal cutters and cut a 2x4 block that's 2 ft. longer than the poorly supported area.
Step 7
Add a 2x4

Predrill 3/16-in. clearance holes every 12 in. along the 2x4 at a slightly upward angle for the screws. This will prevent splitting and make driving much easier. Then apply construction adhesive liberally to the top and the side of blocking before installation to add strength. It should squish out when you screw the 2x4 in place. Press the block tightly to the subfloor and drive 2-1/2 in. wood screws into the joist.
Construction adhesive contains a strong solvent. Wear a respirator with an organic vapor cartridge when working in closely confined areas.
Step 8
Creaky wood floors? Fill gaps with construction adhesive

Sometimes the gapping between the subfloor and joist is too narrow, too irregular or too widespread for shims to be effective. Or perhaps you can't pinpoint the exact source of the squeak.
A good solution is to use a bead of construction adhesive to glue the wood together. You don't have to press the gaps closed; construction adhesive fills the space and hardens.
The key is to force it as far as possible into the gaps without widening them. Work both sides of the joist for a strong, lasting connection. And glue nearby joists as well in case you can't find the exact squeak source. Keep off the floor for a day until the glue hardens.
Step 9
Block beneath squeaky joints
Once in awhile, movement in a subfloor joint will cause a squeak. You can stop it by screwing and gluing 2x8 blocking under the joint to give it solid support.
Step 10
Insert the block
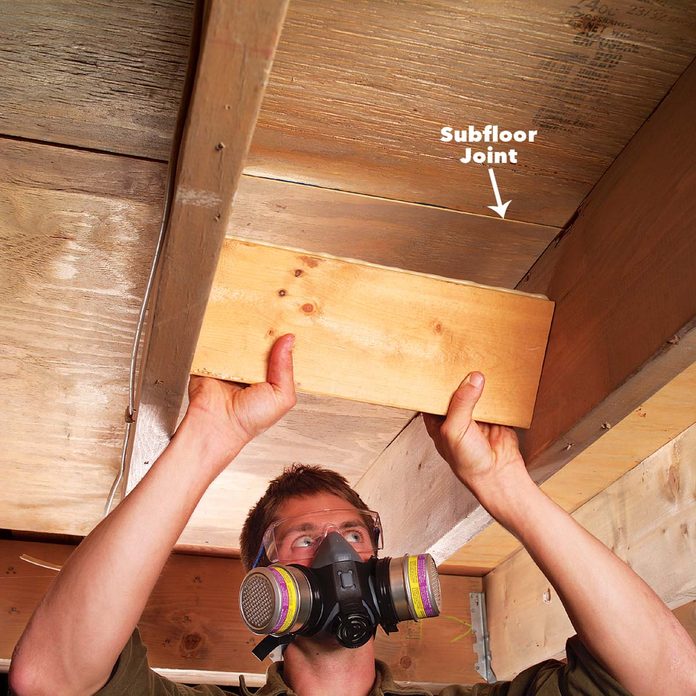
Cut 2x8 blocking to fit snugly between joists. Add construction adhesive to the top and slide it into place.
Step 11
Screw the block

Predrill angled pilot holes with a 1/8-in. bit. Drive 3-in. wood screws to force the block snug against the subfloor seam. Drive an additional pair of screws (or 16d nails) through the joist into the block on each end. Otherwise, it might work loose and cause more squeaks!
Step 12
How to stop hardwood floors for squeaking: Screw hardwood flooring from below
A solid wood floor is usually fastened with hundreds of nails, so squeaks often occur as the floor ages. But some squeaks aren't caused by nails; they come from one edge of a board rubbing on another. A simple "first" solution is to dust the squeaky area of your floor with talcum powder, working it into the cracks. The talc reduces friction and may solve the problem, at least for one season.
Note: Talc can be slippery. Wipe off the excess.
Step 13
How to Screw Floors From Below
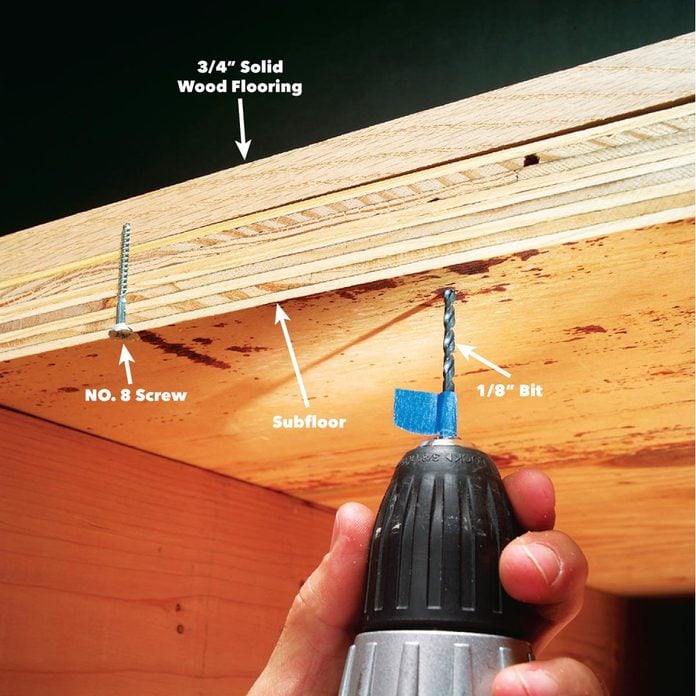
For a more permanent solution, however, you'll usually have to screw the subfloor to the wood flooring from below. Mark the depth of the pilot hole on a 1/8-in. drill bit with tape. Drill a 1/8-in. pilot hole about 1/2 in. less than the thickness of the entire floor, and buy screws 1/4 in. shorter than the floor thickness so they won't penetrate the surface. You can find your floor thickness by either removing a floor register and measuring the floor where the duct comes through, or by drilling a small hole in an out-of-the-way corner and measuring with a nail.
To maintain a safe margin, mark the desired drilling depth on the drill bit with masking tape. Space your screws about every 6 in. in the area of the squeak. Drive No. 8 wood screws flush to the subfloor. Have someone stand on the floor above while you drive the screws. Set the heads flush with the subfloor. Sinking the head into the subfloor could cause the screw point to break through the finished floor surface.
Here's what to do when faced with a noisy fireplace.
how to fix creaky floors
Source: https://www.familyhandyman.com/project/how-to-fix-squeaky-floors/
Posted by: dominquezyoureame.blogspot.com
0 Response to "how to fix creaky floors"
Post a Comment